【代码】无人机航拍图像几何校正
【代码】无人机航拍图像几何校正
ytkz经过这几天的测试,完成无人机航拍图像几何校正,也叫做航片的正射影像处理。
主要步骤如下:
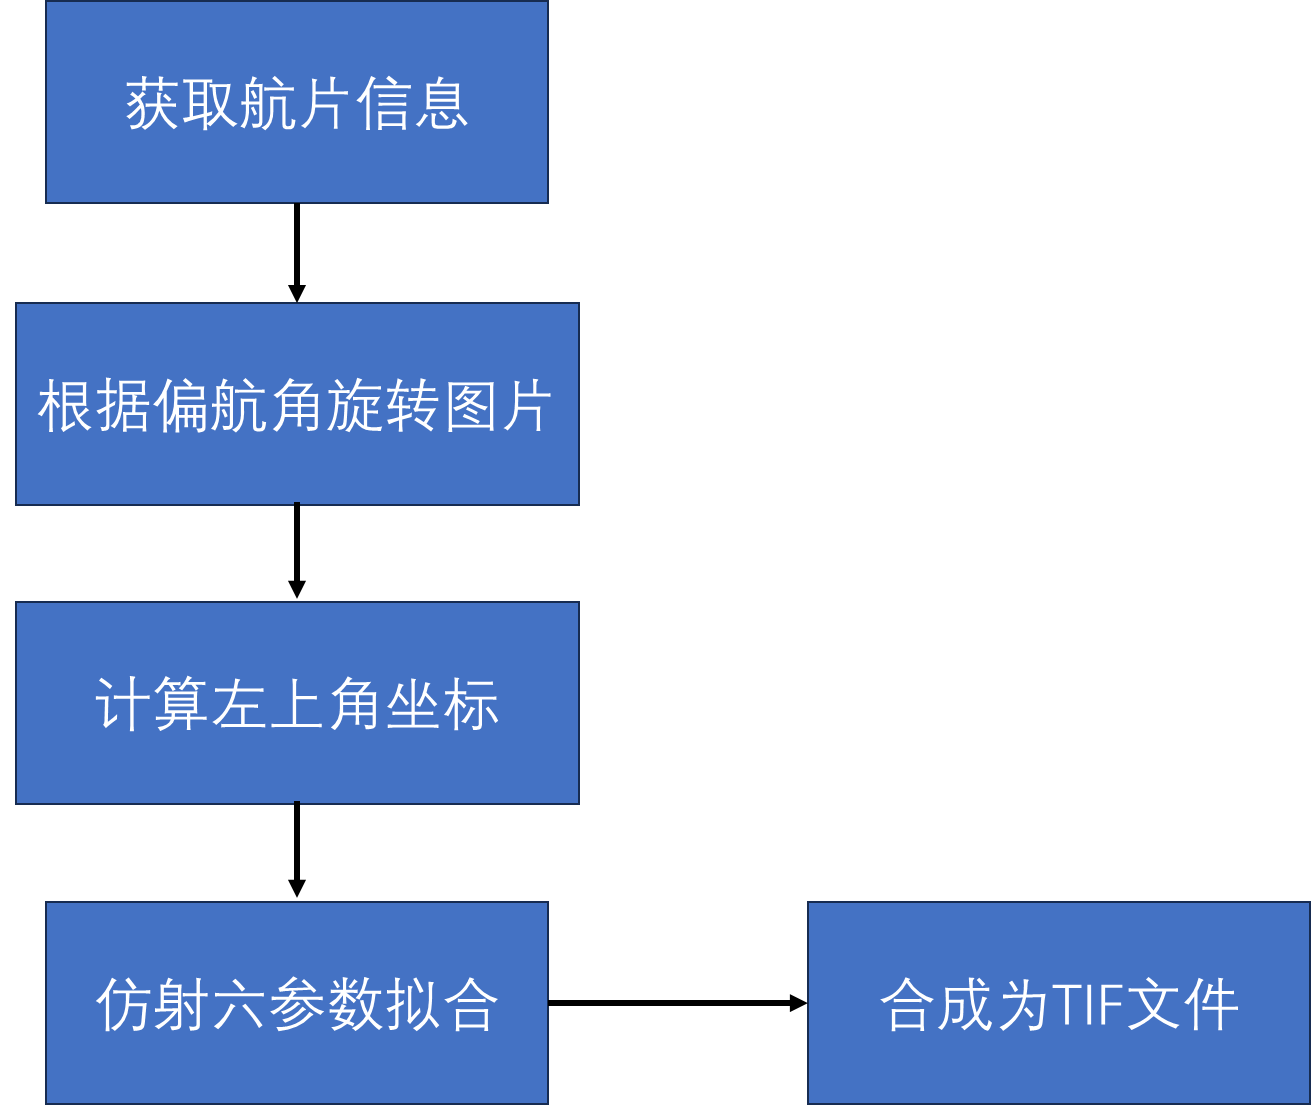
现在对每一个步骤分析,谈论为什么要这样做。
获取航片信息
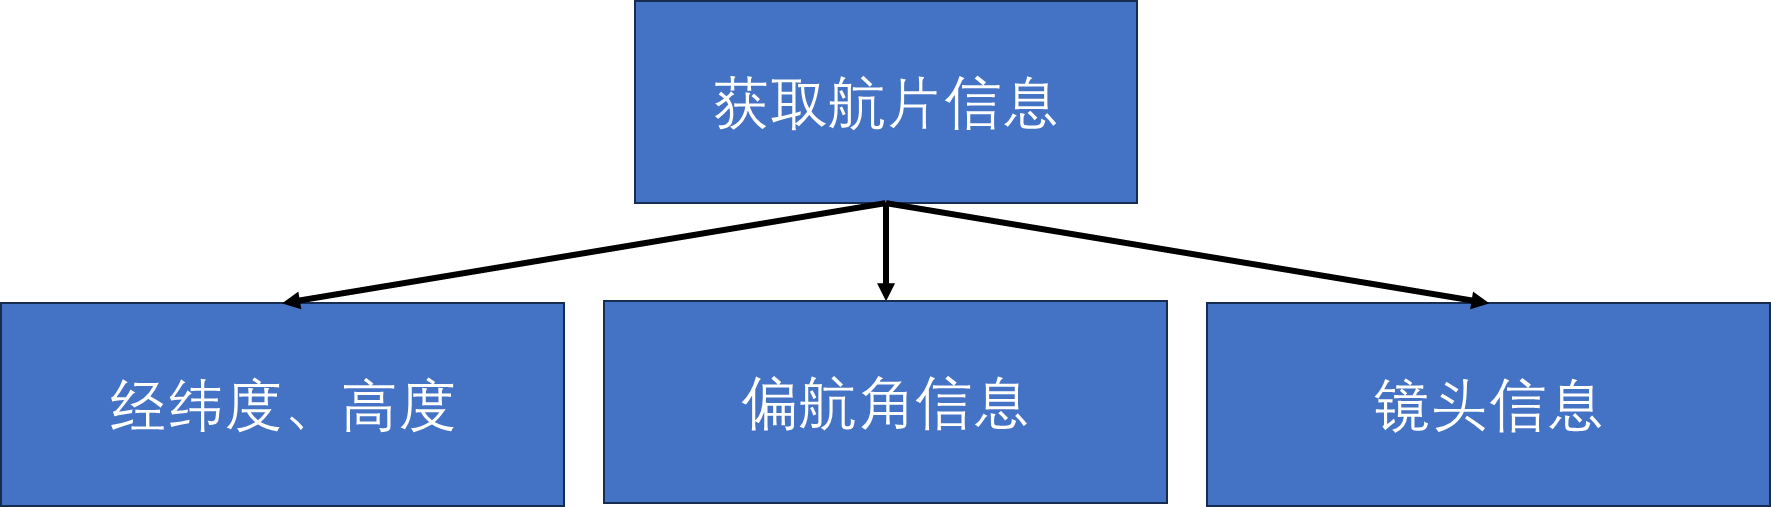
获取航片信息是为了计算影像的分辨率,相关操作可以查看这里。
根据偏航角旋转图片
这步骤是必要的。详细讲解如何实现这一步骤。
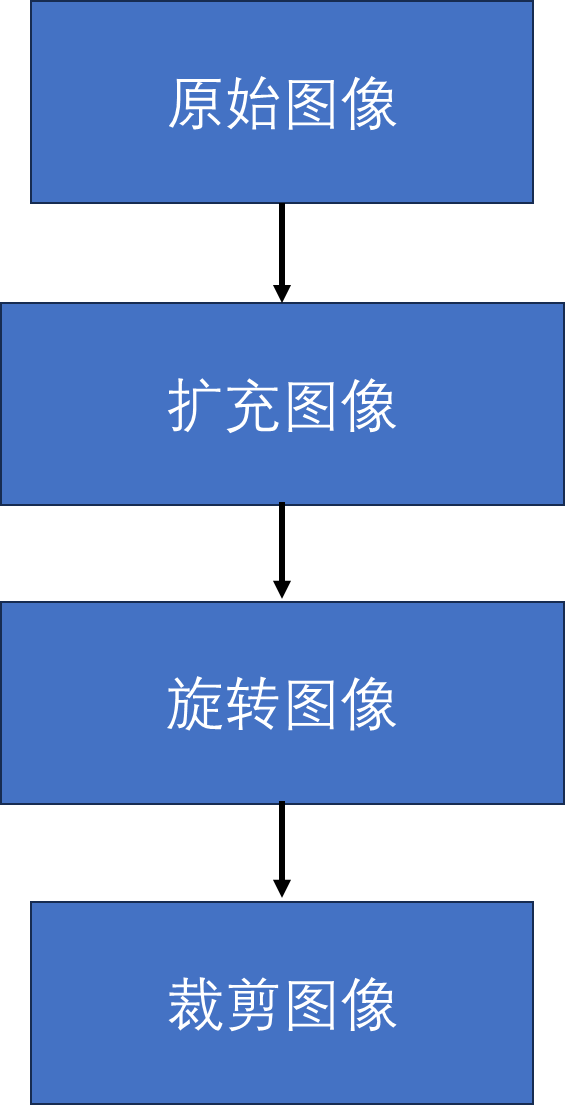
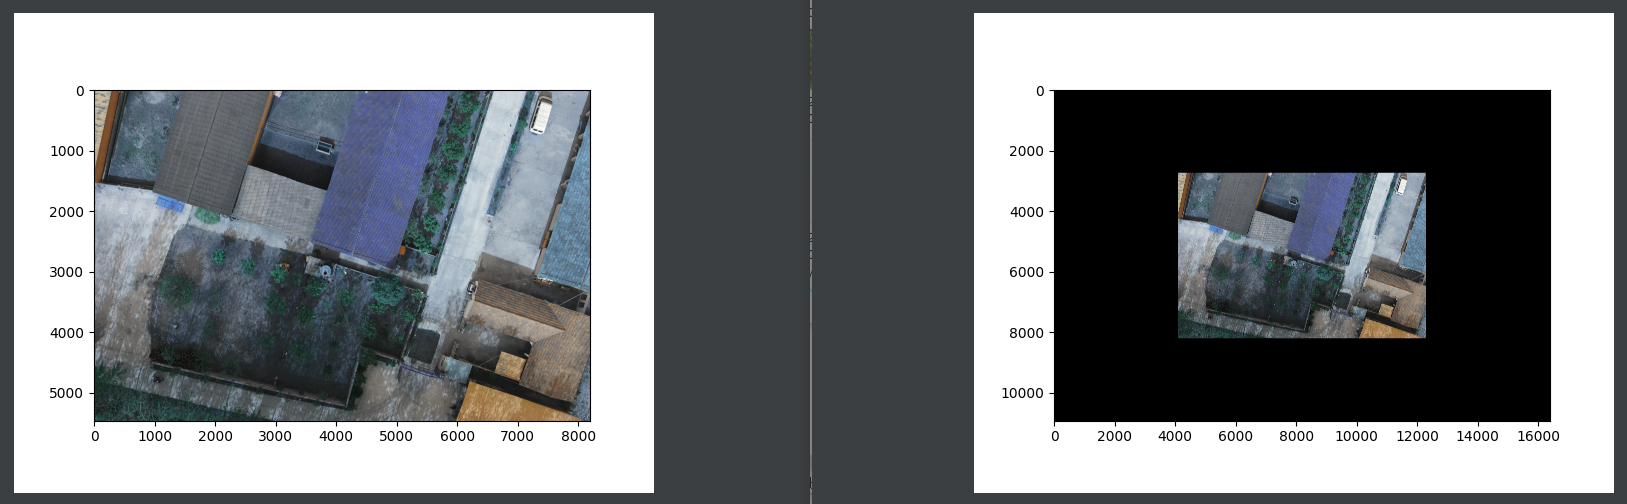
扩充图像的意思是,用0值在图像的边缘填充,这一步骤的目的是,为了 旋转后的图像 还在指定尺寸范围内。
扩充图像效果如下:
下一步是对图像进行旋转,假设偏航角为-45°,则此时要对图像进行逆时针旋转45°。
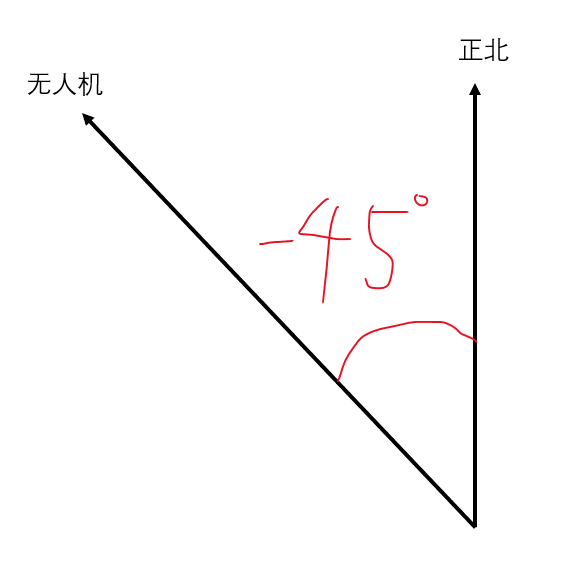
这涉及到另一个问题,偏航角的定义。示意图如下:

简单来说,航迹线偏在航线右边,偏航角为正,航迹线偏在航线左边,偏航角为负。请看下面的灵魂画图。
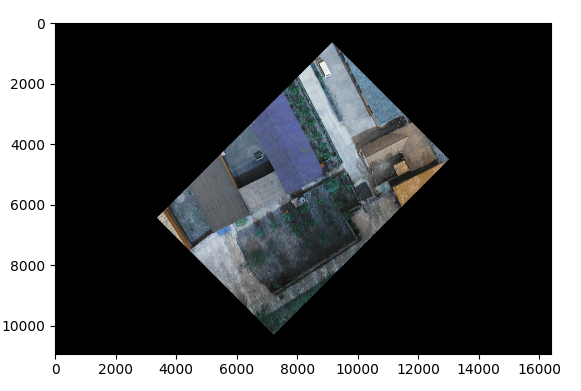
这里假设偏航角是-45度,旋转中心为图像的中心,旋转后的图像如下:
为什么要先扩充图像,再旋转?因为这里调用opencv的函数,如果直接对原始图像进行旋转,会丢失部分信息。
直接对原始图像进行旋转,效果如下:
如上图所示,部分信息被省略了,所以要先用0值扩充图像边缘,使图像的尺寸增加一倍,然后再对扩充后的图像进行旋转。
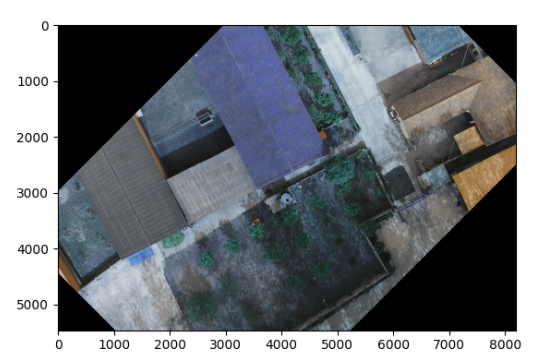
裁剪图像
这一步骤的目的是,为了减少旋转图像的无效像素,缩小图像的尺寸的同时,仅保留有用信息。
裁剪后的旋转图像的效果如下:
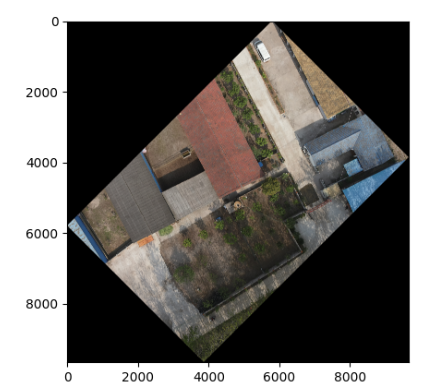
计算左上角坐标
现在得到的结果,是不包含经纬度信息的。我们在第一步的时候,获取了图像的中心的的经纬度、高度、镜头参数。所以我们可以计算此时无人机拍摄照片的空间分辨率。
空间分辨率 = (像元尺寸 x 高度)/ 焦距
以上的单位都要换算为米。
像元尺寸要根据你的无人机硬件参数决定。现在我们的无人机镜头的像元尺寸为4.4微米。
高度、焦距自动从影像文件中获取。
此时的空间分辨率为米,我们需要进行单位换算,把米换算为度。
假设地球的半径为6371004米,则有以下的换算公式:
x_res = x_res_meter / (2 * math.pi * 6371004) * 360 左上角经纬度换算公式如下:
左上角经度 = 中心点经度 - 裁剪后的旋转图像的宽度 x 0.5 x 经度分辨率
左上角纬度 = 中心点纬度 + 裁剪后的旋转图像的宽度 x 0.5 x 纬度分辨率
仿射六参数拟合
通过以上的步骤,我们获得了
1.左上角经纬度
2.空间分辨率
所以我们可以得到该影像的仿射六参数。其格式如下:
[左上角经度,经度分辨率,0,左上角纬度,0,纬度分辨率 ]
由于我们在北半球,所以,上面公式中的经纬度分辨率换算公式如下:
经度分辨率 = 空间分辨率
纬度分辨率 = -1 x 空间分辨率
合成为TIF格式
这里跳用GDAL库,轻松地把裁剪后的旋转图像与仿射六参数结合,生成TIF格式的影像。
代码
#!/usr/bin/env python
# -*- coding: utf-8 -*-
# file: AerialCorrection.py
# time: 2024/5/12 16:49

# 航片校正

import os
try:
    import Image
    import ImageDraw
except:
    from PIL import Image
    from PIL.ExifTags import TAGS
import math
from osgeo import gdal, osr

import numpy as np
import cv2
import matplotlib.pyplot as plt

class AerialCorrection():
    def __init__(self, img, out_folder, pixel_size=4.4):
        self.img = img
        self.out_folder = out_folder
        self.temp_name = os.path.join(self.out_folder, os.path.splitext(os.path.basename(img))[0] + '_temp.tif')
        self.out_name = os.path.join(self.out_folder, os.path.splitext(os.path.basename(img))[0] + '.tif')
        self.pixel_size = pixel_size

    def rotation(self):
        latitude1, longitude1 = self.get_gps_info()

        roll_angle, yaw_angle, pitch_angle, altitude = self.get_image_info()
        yaw_angle = -1*yaw_angle
        roll_angle = -1*roll_angle
        img = cv2.imdecode(np.fromfile(self.img ,dtype=np.uint8),-1)
        # img = cv2.imread(self.img)  # 读取彩色图像(BGR)
        height, width = img.shape[:2]  # 图片的高度和宽度
        # 计算新的图像尺寸(这里实际上是原始尺寸的两倍)

        # 计算每个方向的填充量(这里是原始尺寸的一半)
        top = bottom = height // 2
        left = right = width // 2
        padded_img = cv2.copyMakeBorder(img, top, bottom, left, right, cv2.BORDER_CONSTANT, value=[0, 0, 0])

        rotated_image = rotate_image(padded_img, yaw_angle)

        cropped_image = self.find_edge(rotated_image)

        new_height,new_width = cropped_image.shape[:2]

        focal_length = self.get_len_info()  # 镜头参数
        x_res_meter = float(self.pixel_size) * altitude / float(focal_length)  * 0.001  # 空间分辨率  单位是米

        x_res = x_res_meter / (2 * math.pi * 6371004) * 360   # 空间分辨率  单位是度 0.000008983
        left_coord = [longitude1 - x_res * new_width/ 2, latitude1 + x_res * new_height / 2]
        # left_coord = [longitude1, latitude1]
        out_png_geom = [left_coord[0], x_res, 0.0, left_coord[1], 0.0, -x_res]

        srs = osr.SpatialReference()
        srs.ImportFromEPSG(4326)

        # export the png tif
        driver = gdal.GetDriverByName('GTiff')
        # out_tif = driver.Create(name=out_name, ysize=tar_y, xsize=tar_x, bands=tar_bandnum, eType=tar_datatype)
        out_tif = driver.Create(self.out_name, new_width, new_height, 3, eType=gdal.GDT_Byte)
        j=2
        for i in range(3):

            band = out_tif.GetRasterBand(i + 1).WriteArray(cropped_image[:,:,j-i])
            del band

        out_tif.SetProjection(srs.ExportToWkt())
        out_tif.SetGeoTransform(out_png_geom)
        out_tif.FlushCache()

    def find_edge(self,arr):
        # 删减图像中的黑框
        temp_arr = arr[:,:,0]
        # 二值化
        _, thresh = cv2.threshold(temp_arr, 1, 255, cv2.THRESH_BINARY)

        # 找到轮廓
        contours, _ = cv2.findContours(thresh, cv2.RETR_EXTERNAL, cv2.CHAIN_APPROX_SIMPLE)

        # 如果没有检测到轮廓,则退出
        if not contours:
            print("No contours found.")
            exit()

        # 获取最大轮廓
        c = max(contours, key=cv2.contourArea)
        # 计算边界框
        x, y, w, h = cv2.boundingRect(c)
        cropped_image = arr[y:y+h, x:x+w,:]
        plt.imshow(cv2.cvtColor(cropped_image, cv2.COLOR_BGR2RGB))
        plt.show()
        return cropped_image

    def exif(self):
        """
        从图片中返回EXIF元数据
        """
        exif_data = {}

        try:
            i = Image.open(self.img)  # 使用PIL库打开图片
            tags = i._getexif()  # 获取图片的EXIF标签

            for tag, value in tags.items():
                decoded = TAGS.get(tag, tag)  # 尝试从预定义的TAGS字典中获取标签的中文描述,否则使用标签ID
                exif_data[decoded] = value  # 将标签及其值存储到exif_data字典中

        except Exception as e:
            print(e)  # 捕获所有异常并忽略,这通常不是一个好的做法,应该明确指定要捕获的异常

        return exif_data
    def get_image_size(self):
        i = Image.open(self.img)
        return i.width, i.height


    def get_image_info(self):
        """
        :param file_path: 输入图片路径
        :return: 图片的偏航角
        """
        # 获取图片偏航角
        b = b"\x3c\x2f\x72\x64\x66\x3a\x44\x65\x73\x63\x72\x69\x70\x74\x69\x6f\x6e\x3e"
        a = b"\x3c\x72\x64\x66\x3a\x44\x65\x73\x63\x72\x69\x70\x74\x69\x6f\x6e\x20"
        img = open(self.img, 'rb')
        data = bytearray()
        dj_data_dict = {}
        flag = False
        for line in img.readlines():
            if a in line:
                flag = True
            if flag:
                data += line
            if b in line:
                break
        if len(data) > 0:
            data = str(data.decode('ascii'))
            lines = list(filter(lambda x: 'drone-dji:' in x, data.split("\n")))
            for d in lines:
                d = d.strip()[10:]
                key, value = d.split("=")
                dj_data_dict[key] = value

        return float(dj_data_dict["FlightRollDegree"][1:-1]),float(dj_data_dict["FlightYawDegree"][1:-1]),float(dj_data_dict["FlightPitchDegree"][1:-1]), float(dj_data_dict["RelativeAltitude"][1:-1])

    def get_len_info(self):
        exif = self.exif()
        lat = None  # 纬度
        lon = None  # 经度

        if exif.get('LensSpecification'):  # 如果EXIF中包含GPS信息
            # 纬度
            Lens = exif['LensSpecification']
            focal_length = Lens[1]  # 焦距
        return focal_length

    def get_gps_info(self):
        """
        从EXIF元数据中提取GPS信息、偏航信息
        """
        exif = self.exif()
        lat = None  # 纬度
        lon = None  # 经度

        if exif.get('GPSInfo'):  # 如果EXIF中包含GPS信息
            # 纬度
            coords = exif['GPSInfo']
            i = coords[1]  # 纬度方向(N/S)
            d = coords[2][0]  # 纬度度数
            m = coords[2][1]  # 纬度分钟
            s = coords[2][2]  # 纬度秒
            lat = self.dms2dd(d, m, s, i)  # 将纬度转换为十进制度

            # 经度
            i = coords[3]  # 经度方向(E/W)
            d = coords[4][0]  # 经度度数
            m = coords[4][1]  # 经度分钟
            s = coords[4][2]  # 经度秒
            lon = self.dms2dd(d, m, s, i)  # 将经度转换为十进制度

        return lat, lon

    def dms2dd(self, d, m, s, i):
        """
        将度/分/秒转换为十进制度
        """
        sec = float((m * 60) + s)  # 将分和秒转换为秒
        dec = float(sec / 3600)  # 将秒转换为小数度
        deg = float(d + dec)  # 将度和小数度相加

        if i.upper() == 'W':  # 如果方向是西
            deg = deg * -1  # 将度数变为负数

        elif i.upper() == 'S':  # 如果方向是南
            deg = deg * -1  # 将度数变为负数

        return float(deg)
def rotate_image(image, yaw):
    # 获取图像尺寸
    height, width = image.shape[:2]

    # 计算旋转中心
    center = (width // 2, height // 2)

    # 计算旋转矩阵
    rotation_matrix = cv2.getRotationMatrix2D(center, yaw, 1.0)

    # 应用偏航旋转
    rotated_image = cv2.warpAffine(image, rotation_matrix, (width, height))
    return rotated_image


if __name__ == '__main__':
    A = AerialCorrection(r'E:\109弥市镇——康家档子北\DJI_20230410091159_0017.JPG', r'D:\test', pixel_size= 4.4)

    a = A.rotation()
    print(a)
最终结果展示
google earth上的测试区范围如下:
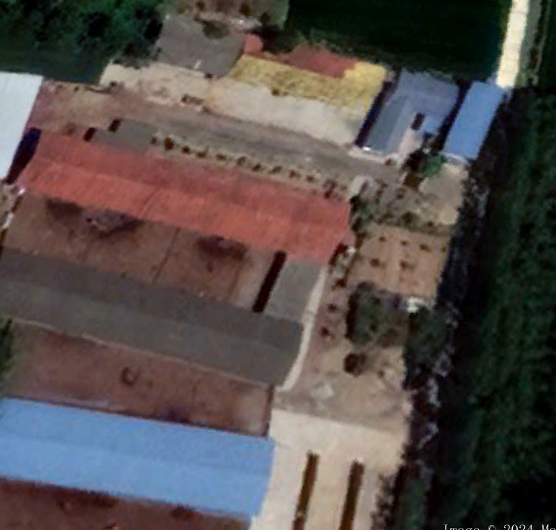
把结果拖到google earth上,如下图所示:
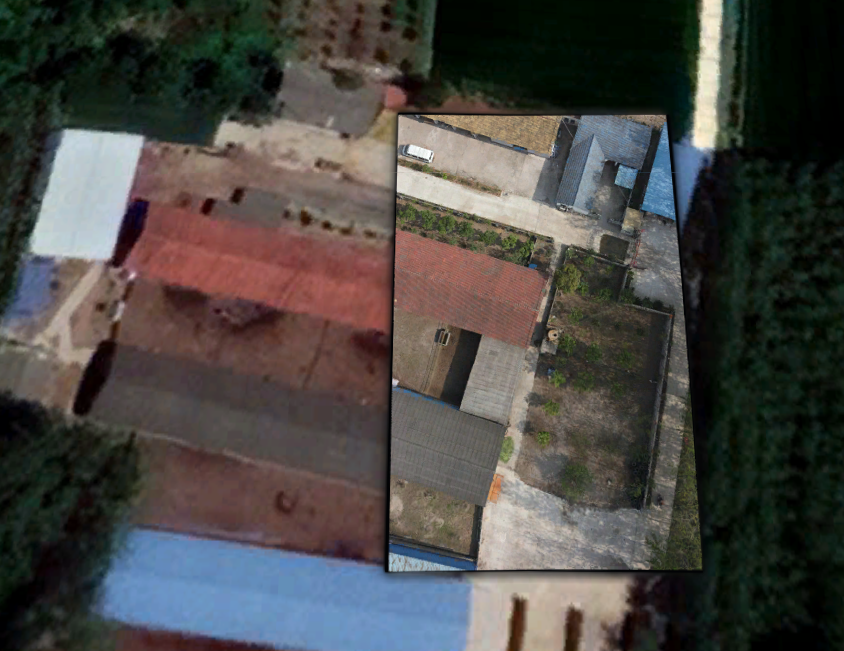
以上可以认为是航片的粗几何校正。存在有一定的偏差,在2米左右。
这是因为我们在计算空间分辨率的时候,是假设地球半径。实际上当地的地球半径不是我们假设的通用地球半径。优化思路可以根据当地的经纬度,进行UTM坐标转换为WGS84坐标。
如果要精细化校正,则再需要进行特征点匹配,进行航片与底图的配准、航片与航片直接的配置。
代码已开源,地址在:
https://github.com/ytkz11/AerialPictureCorrection
欢迎给我一个免费的star,这次代码和样本数据就不放在百度云了,直接放在github。
样本数据是一个小伙伴提供的,现在只分享一景,作为测试数据。
之后会对代码进行讲解。明天先把代码整合,使其可以批量对航片处理,最后打包为exe,会用云盘的方式分享出来。


