conda教程
conda教程
ytkz上个月有小伙伴留言:怎么实现遥感图像的放大缩小平移操作。
很久以前曾经写过相应的控件,该控件具备图片查看、放大、缩小和平移等功能。本文将详细分析代码的功能,并解释如何实现这些功能。
代码实现
继承 QGraphicsView
首先,我们创建了一个类ImageView,该类继承自QGraphicsView,这是Qt库中用于显示和操作2D图形的视图组件。
在初始化方法中,我们设置了控件的光标样式、背景颜色、滚动条策略、渲染提示、缓存模式、控件的初始大小和加载初始图像。。这些设置可以提高图片显示的效果和用户体验。
class ImageView(QGraphicsView):
    """单个影像的图片查看控件"""
    def __init__(self, *args, **kwargs):
        image = kwargs.pop('image', None)
        background = kwargs.pop('background', None)
        super(ImageView, self).__init__(*args, **kwargs)
        self.setCursor(Qt.OpenHandCursor)
        self.setBackground(background)
        self.setHorizontalScrollBarPolicy(Qt.ScrollBarAlwaysOff)
        self.setVerticalScrollBarPolicy(Qt.ScrollBarAlwaysOff)
        self.setRenderHints(QPainter.Antialiasing | QPainter.HighQualityAntialiasing |
                            QPainter.SmoothPixmapTransform)
        self.setCacheMode(self.CacheBackground)
        self.setViewportUpdateMode(self.SmartViewportUpdate)
        self._item = QGraphicsPixmapItem()  # 放置图像
        self._item.setFlags(QGraphicsPixmapItem.ItemIsFocusable |
                            QGraphicsPixmapItem.ItemIsMovable)
        self._scene = QGraphicsScene(self)  # 场景
        self.setScene(self._scene)
        self._scene.addItem(self._item)
        rect = QApplication.instance().desktop().availableGeometry(self)
        self.resize(int(rect.width() * 2 / 3), int(rect.height() * 2 / 3))

        self.pixmap = None
        self._delta = 0.1  # 缩放比例因子
        self.setPixmap(image)
设置背景颜色方法
该方法用于设置背景颜色,可以接受多种类型的颜色参数。
def setBackground(self, color):
    """设置背景颜色"""
    if isinstance(color, QColor):
        self.setBackgroundBrush(color)
    elif isinstance(color, (str, Qt.GlobalColor)):
        color = QColor(color)
        if color.isValid():
            self.setBackgroundBrush(color)
加载图片方法
该方法用于加载图像,可以接受QPixmap、QImage和图像路径等多种类型的图像参数。
def setPixmap(self, pixmap, fitIn=True):
    """加载图片"""
    if isinstance(pixmap, QPixmap):
        self.pixmap = pixmap
    elif isinstance(pixmap, QImage):
        self.pixmap = QPixmap.fromImage(pixmap)
    elif isinstance(pixmap, str) and os.path.isfile(pixmap):
        self.pixmap = QPixmap(pixmap)
    else:
        return
    self._item.setPixmap(self.pixmap)
    self._item.update()
    self.setSceneDims()
    if fitIn:
        self.fitInView(QRectF(self._item.pos(), QSizeF(
            self.pixmap.size())), Qt.KeepAspectRatio)
    self.update()
设置场景尺寸、适应视图方法
设置场景的尺寸,使其与图像的尺寸匹配。
def setSceneDims(self):
    if not self.pixmap:
        return
    self.setSceneRect(QRectF(QPointF(0, 0), QPointF(self.pixmap.width(), self.pixmap.height())))
使图像适应视图窗口,保持或调整图像的纵横比。
def fitInView(self, rect, flags=Qt.IgnoreAspectRatio):
    """剧中适应"""
    if not self.scene() or rect.isNull():
        return
    unity = self.transform().mapRect(QRectF(0, 0, 1, 1))
    self.scale(1 / unity.width(), 1 / unity.height())
    viewRect = self.viewport().rect()
    sceneRect = self.transform().mapRect(rect)
    x_ratio = viewRect.width() / sceneRect.width()
    y_ratio = viewRect.height() / sceneRect.height()
    if flags == Qt.KeepAspectRatio:
        x_ratio = y_ratio = min(x_ratio, y_ratio)
    elif flags == Qt.KeepAspectRatioByExpanding:
        x_ratio = y_ratio = max(x_ratio, y_ratio)
    self.scale(x_ratio, y_ratio)
    self.centerOn(rect.center())
鼠标滚轮事件处理
处理鼠标滚轮事件,实现图像的放大和缩小。
def wheelEvent(self, event):
    if event.angleDelta().y() > 0:
        self.zoomIn()
    else:
        self.zoomOut()
def zoomIn(self):
    """放大"""
    self.zoom(1 + self._delta)

def zoomOut(self):
    """缩小"""
    self.zoom(1 - self._delta)
限制缩放比例
实现图像的缩放功能,并限制缩放比例,以防止图像过大或过小。
def zoom(self, factor):
    """缩放"""
    _factor = self.transform().scale(
        factor, factor).mapRect(QRectF(0, 0, 1, 1)).width()
    if _factor < 0.07 or _factor > 100:
        # 防止过大过小
        return
    self.scale(factor, factor)
主程序
if __name__ == '__main__':
    import sys
    import cgitb
    from PySide2.QtWidgets import QApplication
    tiffile =  r'RPC.tif'
    img = rgb_fuction.ToRGB(tiffile).torgb(2,1,0)
    cgitb.enable(format='text')

    app = QApplication(sys.argv)
    w = ImageView(image=img, background=Qt.white)
    w.show()
    sys.exit(app.exec_())
完整代码
以下的代码是2021年前基于python语言写的,写得很粗糙,但是基本实现了图像放大缩小平移。
import os
from PySide2.QtCore import QPointF, Qt, QRectF, QSizeF
from PySide2.QtGui import QPainter, QColor, QImage, QPixmap
from PySide2.QtWidgets import QGraphicsView, QGraphicsPixmapItem, QGraphicsScene
from osgeo import gdal
import cv2
import numpy as np
import Chinese_Rs_Image
import xml.dom.minidom # 读取xml格式的影像头文件
class ToRGB:
def __init__(self, file):
self.file = file
ds = gdal.Open(self.file)
self.cols = ds.RasterXSize
self.rows = ds.RasterYSize
self.bands = ds.RasterCount
def rgb_linear_percent(self, data, number=0):
print('----------------')
x, y, z = np.shape(data)
data_new = np.zeros(shape=(x, y, z))
for i in range(z):
print(i)
data_8bit = data[:, :, i]
# 把数据转为 8 bit
data_8bit = data_8bit / (np.nanmax(data_8bit)) * 255
# 把数据中的nan转为某个具体数值,例如
data_8bit[np.isnan(data_8bit)] = 0
d2 = np.percentile(data_8bit, number)
u98 = np.percentile(data_8bit, 100 - number)
maxout = 255
minout = 0
data_8bit_new = minout + ((data_8bit - d2) / (u98 - d2)) * (maxout - minout)
data_8bit_new[data_8bit_new < minout] = minout
data_8bit_new[data_8bit_new > maxout] = maxout
data_new[:, :, i] = data_8bit_new
print('--------完成新缩略图的输出--------')
return data_new
def linear_process(self):
ds = gdal.Open(self.file)
image = np.zeros((self.rows, self.cols, self.bands))
for b in range(self.bands):
band = ds.GetRasterBand(b + 1)
image[:, :, b] = band.ReadAsArray(0, 0, self.cols, self.rows)
data = self.rgb_linear_percent(image, 2)
return data
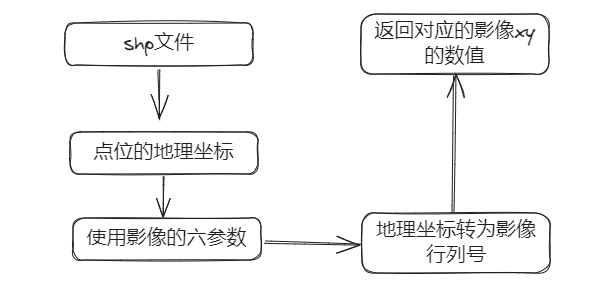
def get_lat_lon(self):
# 获取经纬度
# 读取影像中自带的经纬度
ds = gdal.Open(self.file)
# transform[0] /* top left x 左上角x坐标(经度)*/
# transform[1] /* w--e pixel resolution 东西方向上的像素分辨率*/
# transform[2] /* rotation, 0 if image is "north up" 如果北边朝上,地图的旋转角度*/
# transform[3] /* top left y 左上角y坐标(纬度)*/
# transform[4] /* rotation, 0 if image is "north up" 如果北边朝上,地图的旋转角度*/
# transform[5] /* n-s pixel resolution 南北方向上的像素分辨率*/
transform = ds.GetGeoTransform()
if transform[0] == 0:
# 调用Chinese_Rs_Image的方法,得到一个左上、右上、左下、右下的纬度经度的列表
lat_lon = Chinese_Rs_Image.Pretreatment(os.path.dirname(self.file)).from_xml_get_info()
else:
lat_lon = transform
return lat_lon
def torgb(self,r,g,b):
rgbfile = os.path.splitext(os.path.basename(self.file))[0] + '.jpg'
rgbfile = os.path.join(os.path.dirname(self.file), rgbfile)
data = self.linear_process()
datargb = cv2.merge([data[:, :, r], data[:, :,g], data[:, :, b]])
cv2.imwrite(rgbfile, datargb)
return rgbfile, datargb
class ImageView(QGraphicsView):
"""单个影像的图片查看控件"""
def __init__(self, *args, **kwargs):
image = kwargs.pop('image', None)
background = kwargs.pop('background', None)
super(ImageView, self).__init__(*args, **kwargs)
self.setCursor(Qt.OpenHandCursor)
self.setBackground(background)
self.setHorizontalScrollBarPolicy(Qt.ScrollBarAlwaysOff)
self.setVerticalScrollBarPolicy(Qt.ScrollBarAlwaysOff)
self.setRenderHints(QPainter.Antialiasing | QPainter.HighQualityAntialiasing |
QPainter.SmoothPixmapTransform)
self.setCacheMode(self.CacheBackground)
self.setViewportUpdateMode(self.SmartViewportUpdate)
self._item = QGraphicsPixmapItem() # 放置图像
self._item.setFlags(QGraphicsPixmapItem.ItemIsFocusable |
QGraphicsPixmapItem.ItemIsMovable)
self._scene = QGraphicsScene(self) # 场景
self.setScene(self._scene)
self._scene.addItem(self._item)
rect = QApplication.instance().desktop().availableGeometry(self)
self.resize(int(rect.width() * 2 / 3), int(rect.height() * 2 / 3))
self.pixmap = None
self._delta = 0.1 # 缩放
self.setPixmap(image)
def setBackground(self, color):
"""设置背景颜色
:param color: 背景颜色
:type color: QColor or str or GlobalColor
"""
if isinstance(color, QColor):
self.setBackgroundBrush(color)
elif isinstance(color, (str, Qt.GlobalColor)):
color = QColor(color)
if color.isValid():
self.setBackgroundBrush(color)
def setPixmap(self, pixmap, fitIn=True):
"""加载图片
:param pixmap: 图片或者图片路径
:param fitIn: 是否适应
:type pixmap: QPixmap or QImage or str
:type fitIn: bool
"""
if isinstance(pixmap, QPixmap):
self.pixmap = pixmap
elif isinstance(pixmap, QImage):
self.pixmap = QPixmap.fromImage(pixmap)
elif isinstance(pixmap, str) and os.path.isfile(pixmap):
self.pixmap = QPixmap(pixmap)
else:
return
self._item.setPixmap(self.pixmap)
self._item.update()
self.setSceneDims()
if fitIn:
self.fitInView(QRectF(self._item.pos(), QSizeF(
self.pixmap.size())), Qt.KeepAspectRatio)
self.update()
def setSceneDims(self):
if not self.pixmap:
return
self.setSceneRect(QRectF(QPointF(0, 0), QPointF(self.pixmap.width(), self.pixmap.height())))
def fitInView(self, rect, flags=Qt.IgnoreAspectRatio):
"""剧中适应
:param rect: 矩形范围
:param flags:
:return:
"""
if not self.scene() or rect.isNull():
return
unity = self.transform().mapRect(QRectF(0, 0, 1, 1))
self.scale(1 / unity.width(), 1 / unity.height())
viewRect = self.viewport().rect()
sceneRect = self.transform().mapRect(rect)
x_ratio = viewRect.width() / sceneRect.width()
y_ratio = viewRect.height() / sceneRect.height()
if flags == Qt.KeepAspectRatio:
x_ratio = y_ratio = min(x_ratio, y_ratio)
elif flags == Qt.KeepAspectRatioByExpanding:
x_ratio = y_ratio = max(x_ratio, y_ratio)
self.scale(x_ratio, y_ratio)
self.centerOn(rect.center())
def wheelEvent(self, event):
if event.angleDelta().y() > 0:
self.zoomIn()
else:
self.zoomOut()
def zoomIn(self):
"""放大"""
self.zoom(1 + self._delta)
def zoomOut(self):
"""缩小"""
self.zoom(1 - self._delta)
def zoom(self, factor):
"""缩放
:param factor: 缩放的比例因子
"""
_factor = self.transform().scale(
factor, factor).mapRect(QRectF(0, 0, 1, 1)).width()
if _factor < 0.07 or _factor > 100:
# 防止过大过小
return
self.scale(factor, factor)
if __name__ == '__main__':
import sys
import cgitb
from PySide2.QtWidgets import QApplication
tiffile = r'RPC.tif'
img = rgb_fuction.ToRGB(tiffile).torgb(2,1,0)
cgitb.enable(format='text')
app = QApplication(sys.argv)
w = ImageView(image=img, background=Qt.white)
w.show()
sys.exit(app.exec_())
效果如下:
结论
我们已经成功实现了一个基于PySide2的影像查看控件,该控件能够加载、显示、放大、缩小和平移影像。这种缩放和平移逻辑在ArcGIS、ENVI等GIS和遥感图像处理软件中也有类似的实现。
只是arcgis这类的商业软件直接读取金字塔文件ovr。ovr格式其实是一种特殊的tif格式。
而上面的代码是把tif先转为RGB图片,然后再对RGB图片进行可视化。
现在只是对图片查看、放大、缩小和平移的技术谈论,收工。
(完)