快速制作 YOLO-Seg 遥感分割样本
快速制作 YOLO-Seg 遥感分割样本
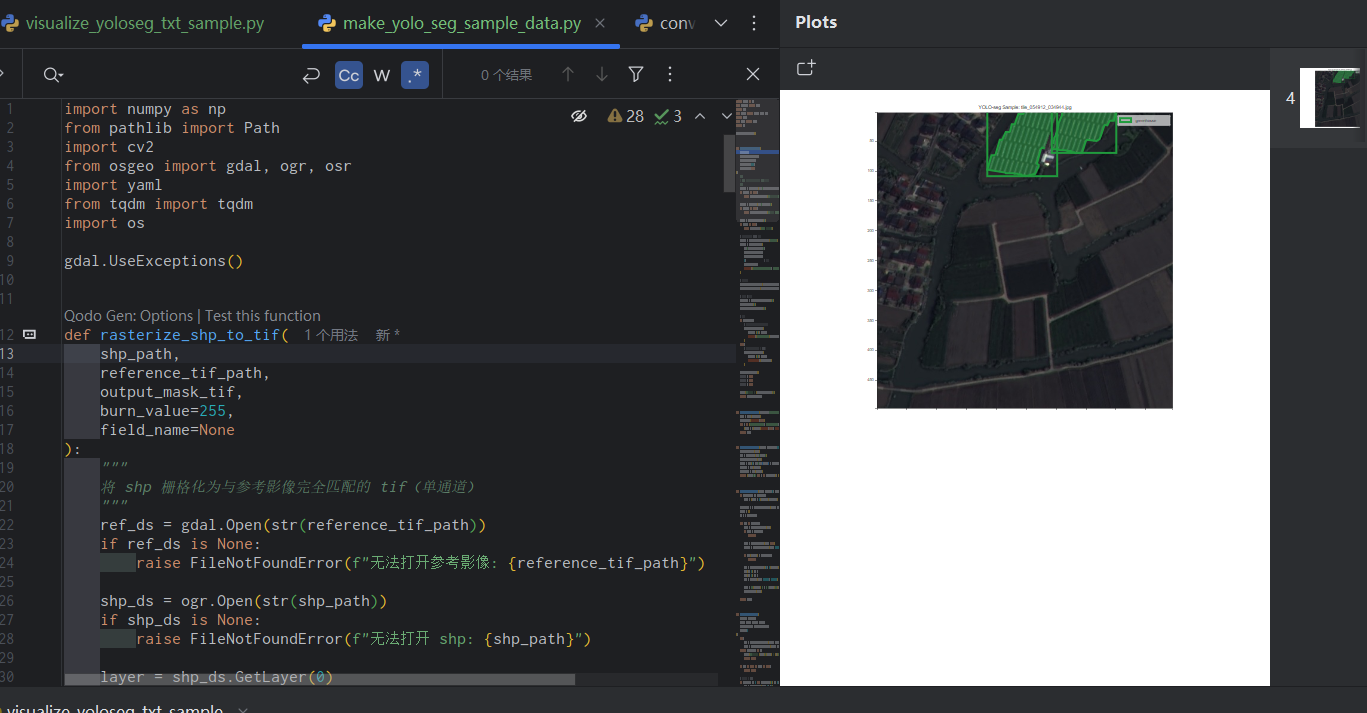
ytkz大家好,我是小白。今天分享一个轻量化脚本,只需配置路径和少量参数,就能基于 TIFF 影像 + SHP 矢量自动生成 YOLO-Seg 格式的分割样本,还能自动划分训练 / 验证集、生成标准 data.yaml 配置文件,开箱即用!
当然,前提是,要提前绘制好矢量。绘制矢量这个步骤很麻烦,费时费力,不在这里细说。
核心思路
整个流程无需复杂操作,核心就 4 步:
- 矢量栅格化:将 SHP 矢量转为与 TIFF 影像尺寸、投影完全匹配的二值掩膜(有目标的区域为 255,背景为 0);
- 滑窗分块:对大尺寸 TIFF 和掩膜按指定尺寸滑窗分块,支持重叠率设置;
- 标签生成:从掩膜中提取目标轮廓,归一化后生成 YOLO-Seg 格式标签(自动过滤小面积无效轮廓);
- 数据集整理:随机划分训练 / 验证集,生成 YOLO 训练所需的 data.yaml 文件。
快速使用
1. 配置参数
只需修改代码末尾的 4 个核心路径 / 参数:
TIFF_PATH = r"你的大尺寸TIFF影像路径"
SHP_PATH = r"对应的SHP矢量文件路径"
OUTPUT_DIR = r"样本输出目录"
temp_mask_tif = r"临时掩膜文件保存路径"  # 建议和输出目录同盘
2. 调整关键参数
根据需求修改分块 / 过滤规则:
tile_size=512:分块尺寸(如 512×512、1024×1024);overlap=128:滑窗重叠像素(避免目标被切割);val_ratio=0.12:验证集比例(默认 12%);min_area=50:最小轮廓面积(过滤小碎片噪声)。
3. 运行代码
第一次运行设置force_rasterize=True生成掩膜,后续复用掩膜时设为False可节省时间,运行后自动生成:
images/train//images/val/:分块后的影像样本;labels/train//labels/val/:对应的 YOLO-Seg 标签;data.yaml:YOLO 训练标准配置文件。
完整代码
以下是可直接复用的完整代码,复制到本地,替换路径即可运行:
import numpy as np
from pathlib import Path
import cv2
from osgeo import gdal, ogr, osr
import yaml
from tqdm import tqdm
import os

gdal.UseExceptions()


def rasterize_shp_to_tif(
    shp_path,
    reference_tif_path,
    output_mask_tif,
    burn_value=255,
    field_name=None
):
    """
    将 shp 栅格化为与参考影像完全匹配的 tif(单通道)
    """
    ref_ds = gdal.Open(str(reference_tif_path))
    if ref_ds is None:
        raise FileNotFoundError(f"无法打开参考影像: {reference_tif_path}")

    shp_ds = ogr.Open(str(shp_path))
    if shp_ds is None:
        raise FileNotFoundError(f"无法打开 shp: {shp_path}")

    layer = shp_ds.GetLayer(0)
    if layer is None:
        raise ValueError("shp 中没有图层")

    # 创建输出栅格(单通道 Byte 类型)
    driver = gdal.GetDriverByName('GTiff')
    out_ds = driver.Create(
        str(output_mask_tif),
        ref_ds.RasterXSize,
        ref_ds.RasterYSize,
        1,                  # 单波段
        gdal.GDT_Byte,
        options=['COMPRESS=DEFLATE', 'TILED=YES']
    )

    # 复制地理信息
    out_ds.SetGeoTransform(ref_ds.GetGeoTransform())
    out_ds.SetProjection(ref_ds.GetProjection())

    # 初始化为 0(背景)
    out_band = out_ds.GetRasterBand(1)
    out_band.Fill(0)
    out_band.SetNoDataValue(0)

    # 栅格化
    if field_name:
        # 如果要根据某个字段的值来烧录(例如不同地类)
        gdal.RasterizeLayer(
            out_ds, [1], layer,
            options=[f"ATTRIBUTE={field_name}"]
        )
    else:
        # 简单烧录固定值(这里是耕地 → 255)
        gdal.RasterizeLayer(
            out_ds, [1], layer,
            burn_values=[burn_value]
        )

    out_ds.FlushCache()
    out_ds = None
    ref_ds = None
    shp_ds = None

    print(f"栅格化完成 → {output_mask_tif}")
    return output_mask_tif


def create_yolo_folders(base_dir="yolo_large_dataset"):
    base = Path(base_dir)
    base.mkdir(exist_ok=True)
    for d in ["images/train", "images/val", "labels/train", "labels/val"]:
        (base / d).mkdir(parents=True, exist_ok=True)
    return base


def split_list_randomly(items, val_ratio=0.1, seed=42):
    np.random.seed(seed)
    idx = np.arange(len(items))
    np.random.shuffle(idx)
    n_val = max(1, int(len(items) * val_ratio))
    val_idx = idx[:n_val]
    train_idx = idx[n_val:]
    return [items[i] for i in train_idx], [items[i] for i in val_idx]


def mask_to_yolo_lines(mask, cls_id=0, min_area=50, min_points=6):
    if mask.dtype != np.uint8:
        mask = (mask > 0).astype(np.uint8) * 255

    contours, _ = cv2.findContours(mask, cv2.RETR_EXTERNAL, cv2.CHAIN_APPROX_SIMPLE)
    lines = []
    h, w = mask.shape

    for cnt in contours:
        area = cv2.contourArea(cnt)
        if area < min_area:
            continue

        peri = cv2.arcLength(cnt, True)
        approx = cv2.approxPolyDP(cnt, 0.002 * peri, True)

        if len(approx) < min_points:
            continue

        pts = approx.reshape(-1, 2).astype(np.float32)
        pts[:, 0] /= w
        pts[:, 1] /= h
        pts = np.clip(pts, 0.0001, 0.9999)

        line = f"{cls_id} " + " ".join(f"{v:.6f}" for v in pts.ravel())
        lines.append(line)

    return lines


def process_one_window(
    img_ds, mask_ds,
    xoff, yoff, win_w, win_h,
    out_img_path, out_label_path,
    cls_id=0
):
    try:
        img = img_ds.ReadAsArray(xoff, yoff, win_w, win_h)
        mask = mask_ds.ReadAsArray(xoff, yoff, win_w, win_h)
    except Exception as e:
        print(f"窗口读取失败 {xoff},{yoff} → {e}")
        return False

    if img is None or mask is None:
        return False

    # 影像预处理 → BGR
    if img.ndim == 3 and img.shape[0] == 3:
        img = np.moveaxis(img, 0, -1)
    if img.ndim == 3:
        img = cv2.cvtColor(img, cv2.COLOR_RGB2BGR)
    elif img.ndim == 2:
        img = cv2.cvtColor(img, cv2.COLOR_GRAY2BGR)

    if not cv2.imwrite(str(out_img_path), img):
        return False

    lines = mask_to_yolo_lines(mask, cls_id)
    if not lines:
        out_img_path.unlink(missing_ok=True)
        return False

    with open(out_label_path, "w", encoding="utf-8") as f:
        f.write("\n".join(lines) + "\n")

    return True


def tile_large_image_with_shp_mask(
    image_tif: str,
    shp_path: str,
    output_base="yolo_crop_dataset",
    temp_mask_tif="temp_mask.tif",      # 中间生成的栅格mask
    tile_size=1024,
    overlap=128,
    min_area=50,
    val_ratio=0.12,
    cls_id=0,
    force_rasterize=False
):
    image_tif = Path(image_tif)
    shp_path = Path(shp_path)
    temp_mask = Path(temp_mask_tif)

    # 第一步:如果没有 mask 或强制重新生成 → 栅格化
    if force_rasterize or not temp_mask.exists():
        rasterize_shp_to_tif(
            shp_path=shp_path,
            reference_tif_path=image_tif,
            output_mask_tif=temp_mask,
            burn_value=255,
            field_name=None   # 如果 shp 有字段想区分,可改这里
        )

    # 打开大影像和大 mask
    img_ds = gdal.Open(str(image_tif))
    mask_ds = gdal.Open(str(temp_mask))

    if not img_ds or not mask_ds:
        raise RuntimeError("无法打开影像或 mask")

    width = img_ds.RasterXSize
    height = img_ds.RasterYSize
    print(f"影像尺寸:{width} × {height}")

    base = create_yolo_folders(output_base)
    patches = []

    step = tile_size - overlap

    for y in tqdm(range(0, height, step), desc="行"):
        for x in range(0, width, step):
            win_w = min(tile_size, width - x)
            win_h = min(tile_size, height - y)

            stem = f"tile_{x:06d}_{y:06d}"
            img_p = base / "images" / f"{stem}.jpg"
            lbl_p = base / "labels" / f"{stem}.txt"

            success = process_one_window(
                img_ds, mask_ds, x, y, win_w, win_h,
                img_p, lbl_p, cls_id
            )

            if success:
                patches.append(stem)

    img_ds = None
    mask_ds = None

    # 分 train/val
    train_p, val_p = split_list_randomly(patches, val_ratio)

    for phase, stems in [("train", train_p), ("val", val_p)]:
        for stem in stems:
            (base / "images" / f"{stem}.jpg").rename(
                base / f"images/{phase}" / f"{stem}.jpg"
            )
            (base / "labels" / f"{stem}.txt").rename(
                base / f"labels/{phase}" / f"{stem}.txt"
            )

    # data.yaml
    yaml_content = {
        "path": str(base.absolute()),
        "train": "images/train",
        "val": "images/val",
        "names": {0: "cropland"},
        "nc": 1
    }
    with open(base / "data.yaml", "w", encoding="utf-8") as f:
        yaml.safe_dump(yaml_content, f, allow_unicode=True)

    print(f"完成!有效图块数:{len(patches)}")
    print(f"数据集位置:{base}")
    print("提示:中间文件 temp_mask.tif 可保留复用,下次运行可设 force_rasterize=False 节省时间")

if __name__ == "__main__":
    # 配置参数
    TIFF_PATH = r"你的大尺寸TIFF影像路径"
	SHP_PATH = r"对应的SHP矢量文件路径"
	OUTPUT_DIR = r"样本输出目录"
	temp_mask_tif = r"临时掩膜文件保存路径"
    tile_large_image_with_shp_mask(
        image_tif    = TIFF_PATH,
        shp_path     = SHP_PATH,
        output_base  = OUTPUT_DIR,
        temp_mask_tif= temp_mask_tif,  # 建议放在有足够空间的盘
        tile_size    = 512,
        overlap      = 128,
        val_ratio    = 0.12,
        force_rasterize = True,   # 第一次运行设 True,之后可改 False
    )
以上就是本次分享的 YOLO-Seg 遥感分割样本制作脚本,无需复杂配置,一键搞定 TIFF 与 SHP 的样本生成全流程,极大节省遥感 AI 项目的数据预处理时间。
使用时记得先安装完整依赖(pip install gdal opencv-python numpy pyyaml tqdm),替换路径后即可运行;若需适配多类别、调整分块尺寸或过滤规则,可直接修改脚本中对应参数,灵活性拉满。
如果在使用中遇到栅格化失败、标签错位等问题,欢迎在评论区留言交流。后续也会分享更多遥感 AI 数据处理、模型训练技巧,记得点赞收藏,关注不迷路~